Using Web Service Event – Import Connection

In one of the previous articles “Using Web Service Event – Export Connection” we explained the use of Web Service event for an export connection.

In the following section we will demonstrate the use of Web Service event in an import connection (Direction = Write), where in you can import data into Microsoft Dynamics NAV. When you import data into Microsoft Dynamics NAV, an external party makes a call to Microsoft Dynamics NAV Web Service. The Web Service is linked to the BIS Web Service Event codeunit which triggers the pipeline. Other pipeline activities handle the rest of the data import.

There are two commands for importing the data from the external party into NAV:

  • Write Document: When you use this command, the data is exported to NAV and added to the Message Queue. The BIS Pipeline waits for the Job Queue to finalize the import. This is an asynchronous process.
  • Write Document With Response: When you use this command, the data is exported to NAV and immediately processed through the complete pipeline in a synchronous process.

As pointed out in earlier article, there are few things to note before we proceed with an example:

  • The Web Service Event uses standard Microsoft Dynamics NAV web service functionality. Please refer to the standard online help to learn about Working with Web Services.
  • You also need your own client to invoke the web service. This is not in the scope of BIS. However, for testing purpose, you can download and use WCF Storm. It is a free and open source tool for testing web services.

Example:

Setup the Connection:

In this example we will use an existing template to import sales order TI_CS_SALESORDER.IN (available in the software package Or download it here) and modify it to use Web Service event instead of File Reader endpoint.

  1. Click Departments/Business Integration Solutions/Connectivity Studio/Design/Connections
  2. Import the connection TI_CS_SALESORDER.IN from the sample templates.
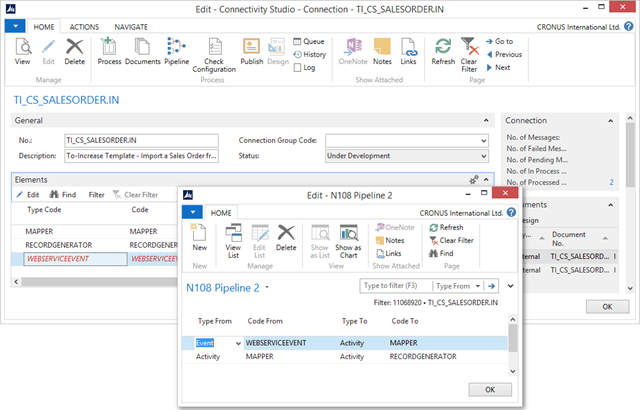
  3. Remove the FILEREADER endpoint form the element list and add WEBSERVICEEVENT. Also make the necessary changes in the pipeline.
    image
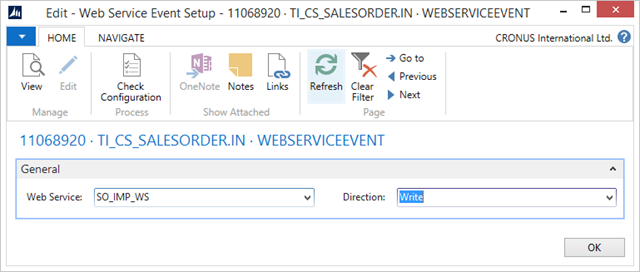
  4. Edit the Web Service Event and fill in the following fields:
    1. Web Service (say SO_IMP_WS). A dialog may pop up, click Yes.
      image
    2. Direction (say Write).
      image

Check the Web Services:

  1. Click Departments/Administration/IT Administration/General/Web Services.
  2. Click Edit List.
  3. Select the web service created in previous step (SO_IMP_WS in this case).
  4. Select the Published checkbox. This will also automatically generate a SOAP URL.image

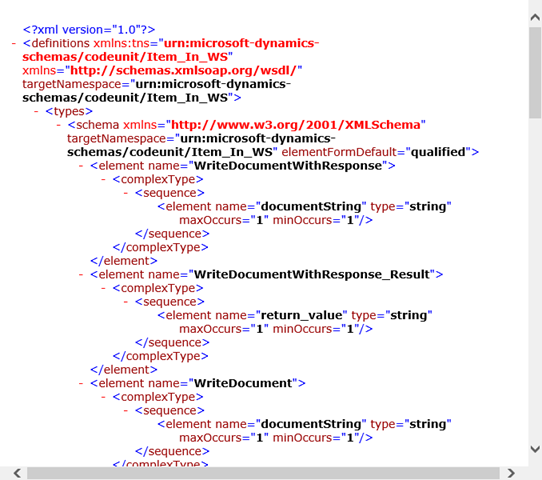
This SOAP URL is ready to be used by your client. Copy the URL and open it in a browser to check the result.

image

Invoking the Web Service Via Client:

  1. For testing purpose, run WCF Storm.
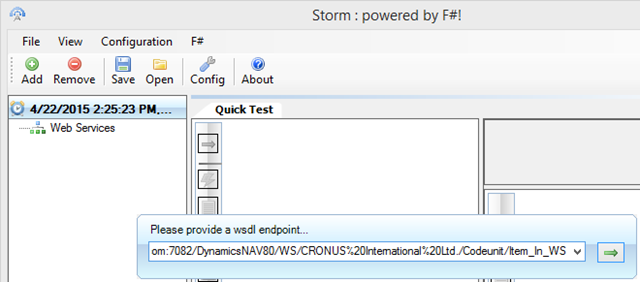
  2. Click Add and add the SOAP URL.
    image
  3. From the software package:
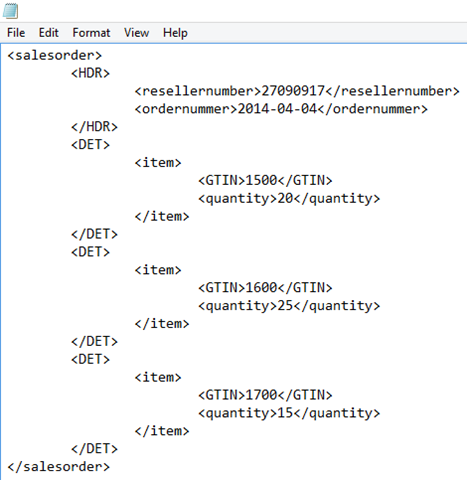
    1. Open the sample file SalesOrderDemo.xml in notepad.
      image
    2. Remove the Word Wrap check (Format, Word Wrap) from the notepad and put everything in one line.
      image
    3. Copy the content.
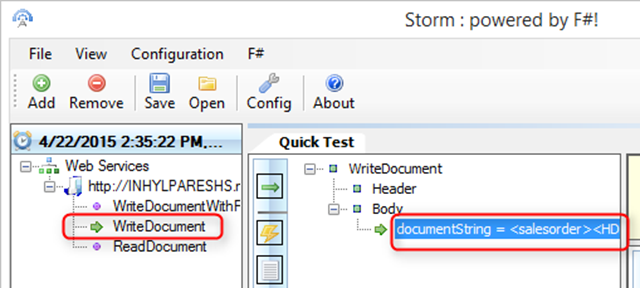
  4. On the WCF Storm window, paste the content in the value of documentString property.
    image
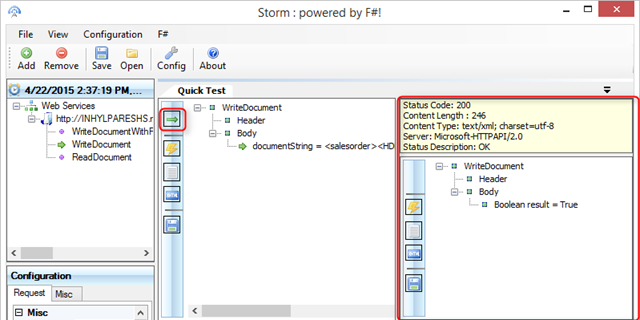
  5. Click Send.
    image
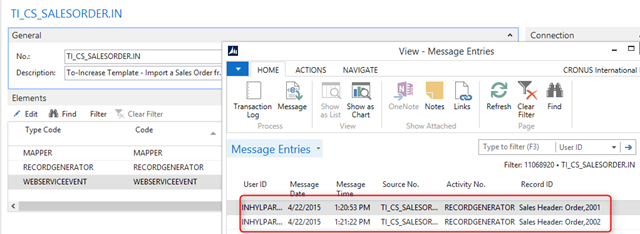
  6. Go the the TI_CS_SALESORDER.IN connection and check the result in History.
    image

The sales order have been imported into Microsoft Dynamics NAV.

Posted in BIS General, Connectivity Studio | Tagged , , , , | 1 Comment

Using Web Service Event – Export Connection

In Business Integration Solutions, the Web Service Event can be used for exporting  data (Direction = Read) from Microsoft Dynamics NAV to an external system. In this case, an external client makes a call to a Microsoft Dynamics NAV Web Service which is linked to a BIS Web Service Event. This in turn triggers the BIS connection and based on the internal document, relevant data is exported.

Now there are few things to note before we proceed with an example:

  • The Web Service Event uses standard Microsoft Dynamics NAV web service functionality. Please refer to the standard online help to learn about Working with Web Services.
  • You also need your own client to invoke the web service. This is not in the scope of BIS. However, for testing purpose, you can download and use WCF Storm. It is a free and open source tool for testing web services.

Example:

Setup the Connection:

In the following example we will try to Read item data from Microsoft Dynamics NAV, based on an internal document and certain filters.

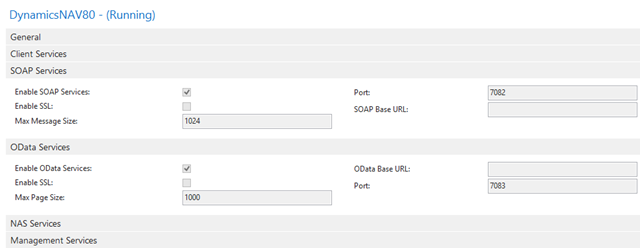
  1. Open Microsoft Dynamics NAV Administration console and make sue that the SOAP Services and ODATA Services are enabled. If not, then enable and restart NAV service.
    image
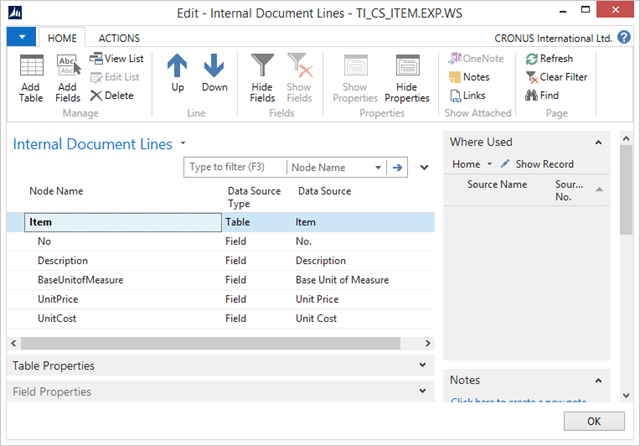
  2. Click Departments/Business Integration Solutions/Connectivity Studio/Design/Documents and create a new internal document (say TI_CS_ITEM.EXP.WS) to expose item data.
    image
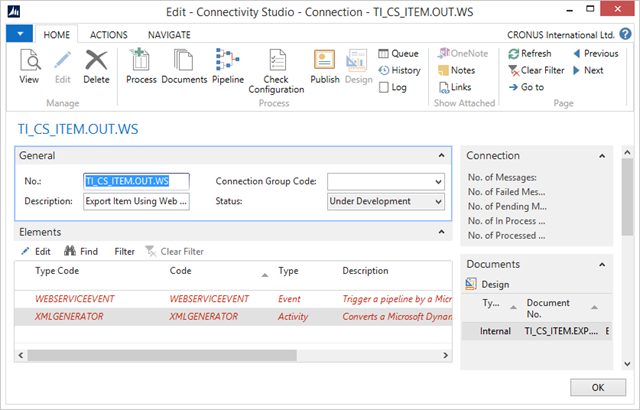
  3. Click Departments/Business Integration Solutions/Connectivity Studio/Design/Connections and create a new connection (say TI_CS_ITEM.OUT.WS).
     image
  4. Do the following:
    1. Attach the document to the connection, created in previous step
    2. Select the following elements and edit the settings:
      1. WEBSERVICEEVENT
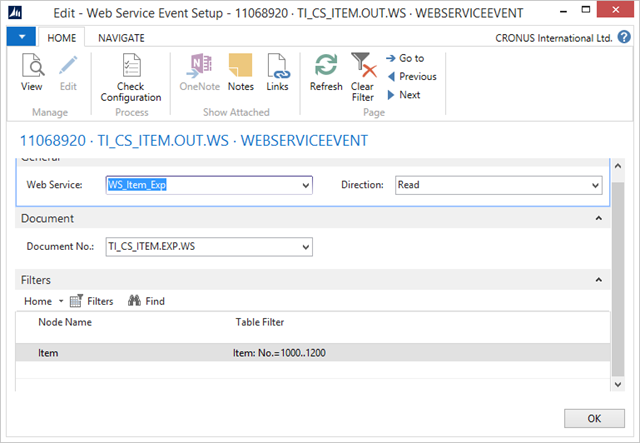
        1. Specify a Web Service (say WS_Item_Exp). If the Web Service is not available, a confirmation dialog will appear, click Yes.
          image
        2. Select the Direction (say Read).
        3. Select the Document No. (say TI_CS_ITEM.EXP.WS).
        4. The Node Name is automatically populated as per the internal document. You can provide Table Filter as well (Item: No.=1000..1200).
          image
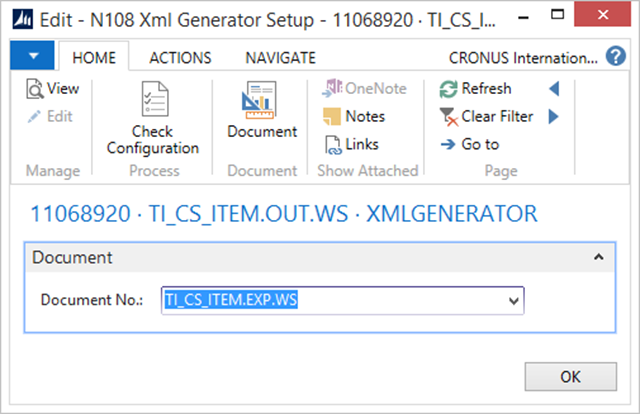
      2. XMLGENERATOR
        Specify the the Document No. (say TI_CS_ITEM.EXP.WS).
        image 
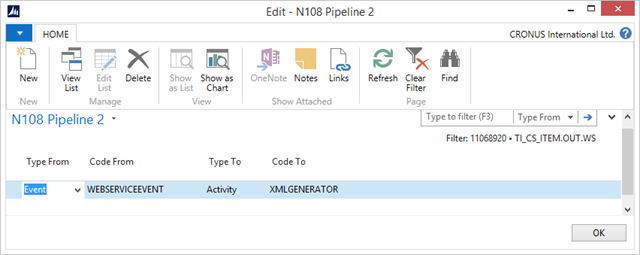
  5. Setup the Pipeline (WEBSERVICEEVENT > XMLGENERATOR).
    image
    You can add other activities as per your business scenario.

Check the Web Service:

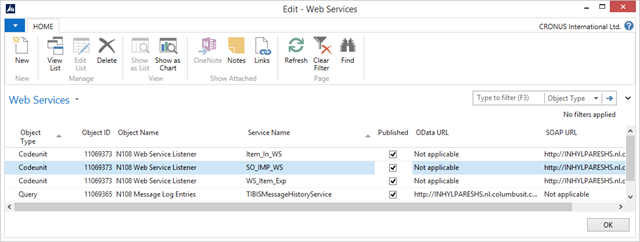
  1. Click Departments/Administration/IT Administration/General/Web Services.
  2. Click Edit List.
  3. Select the web service created in previous step (WS_Item_Exp in this case).
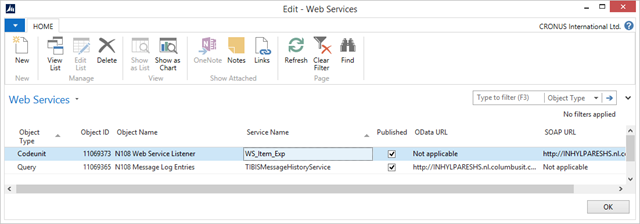
  4. Select the Published checkbox. This will also automatically generate a SOAP URL.
    image

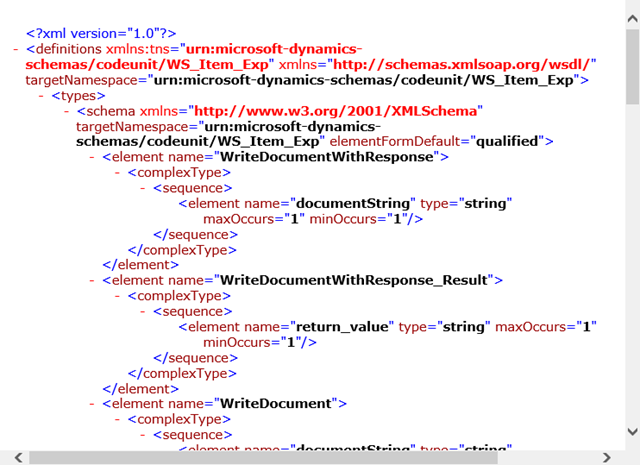
This SOAP URL is ready to be used by your client. Copy the URL and open it in a browser to check the result.

image

Invoking the Web Service Via Client:

An external party calls Microsoft Dynamics NAV Web Service. The call goes to the BIS Web Service Event (codeunit) as it is provided with a link to the Microsoft Dynamics NAV Web Service. Based on the pipeline configuration an export of data takes place.

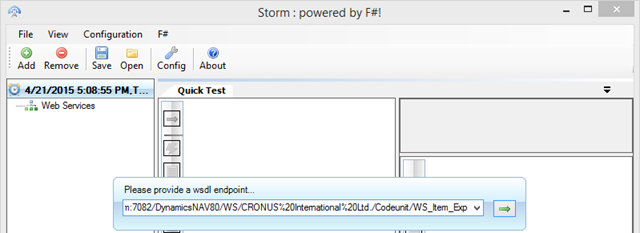
  1. For testing purpose, run WCF Storm.
  2. Click Add and add the SOAP URL.
    image
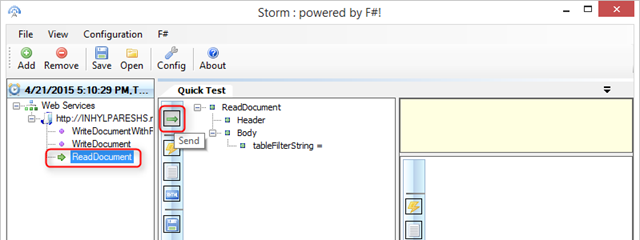
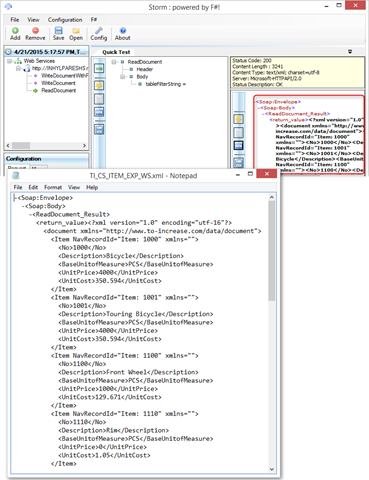
  3. Select Read Document and click Send.
    image
  4. Check the result on the right hand side window. You can also save the file to check the result clearly.
     image

Please check if the filters are applied. You can provide filters from the client as well (tableFilterString) while invoking the Web Service.

Posted in BIS General, Connectivity Studio | Tagged , , , , | 2 Comments

Improvements in Notification Management

For XML to HTML Translator Activity

The Notification Management (part of Business Integration Solutions) has been providing users with CK Editor, specifically intended for consultants or users with little or no knowledge on working with HTML. Its an easy way to create notification body but, you may not necessarily get what you see !

Therefore, we always recommend that you take help of professionals (with HTML knowledge) who can work with the source and create correct notification body with your company branding.

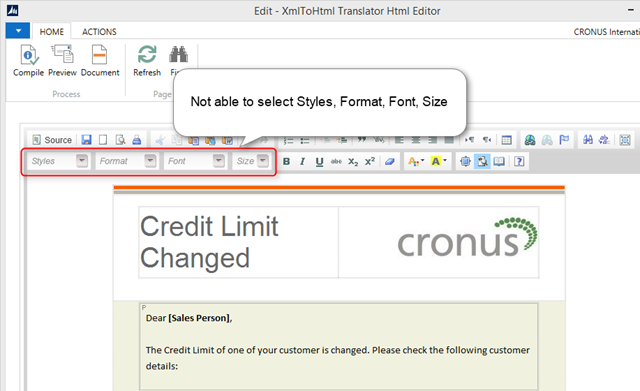
However, many of our partners use the CK Editor and find it helpful. In the past many of those partners contacted us regarding a known issue, i.e. while working with the editor in NAV, they were not able to select Styles, Format, Font and Size.

image

This has been solved with the new build of BIS available for Microsoft Dynamics NAV2013 R2 and Microsoft Dynamics NAV 2015.

What has improved?

  • With the new build you will be able to use the Styles, Format, Font and Size on the editor.
  • We now use the most recent version of the CK Editor (4.4.7), which is running at the following cloud location: Link.
  • We now use a Control Add-in which supports both Windows and Web.

image

For Attachment Generator Activity

  • The PDF Stationery functionality has also been improved.
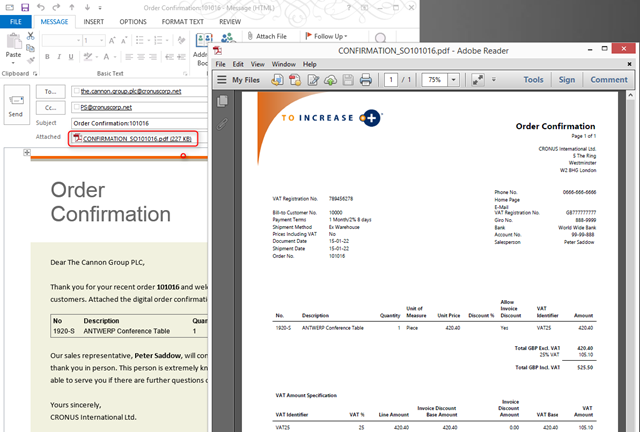
  • Previously you had to change the report to bring the content to the front of the stationery. Now, when you apply a PDF stationery, the default property is set to Send-to-Back, therefore the content of report will always be above the PDF stationery.

Stationary_Output

Upgrade Instructions

If you are installing BIS on a clean W1 database, then you can just follow the instructions available in the installation manual.

However, if you are upgrading BIS from an older build to the latest build then you need to take care of the following points in order to avoid errors:

  1. Look for the following resources in the software release package (DO NOT Unzip):
    1. “NotificationResource.zip”
    2. “Resources.zip”
  2. Click Departments/Administration/IT Administration/General/Control Add-ins.
  3. Look for any Control Add-in starting with “TI.”  ( For example: TI.NotificationEditor.AddIn, TI.DocumentManagement.Control, etc).
  4. Select them and DELETE the entries.
  5. Go to Product Registration page, select all the lines and delete them.
  6. Perform Product Registration once again (i.e. Register, Install and Enable).
  7. Click Departments/Administration/IT Administration/General/Control Add-ins.
  8. Select “TI.NotificationEditor.AddIn” entry and click Import action to import “NotificationResource.zip” (One time action).
  9. Select “TI.DocumentManagement.Control” entry and click Import to import  “Resources.zip” (One time action).
  10. Now try to run the notification.

NOTE: We assume that you have installed the objects and DLLs correctly. For more information please follow the installation manual.

Posted in BIS General, Notification Management | Tagged , , , , , , , , , | Leave a comment

Connectivity Studio – Read and Archive

Recently I had a question from one of our partners, which goes something like this:

I have a simple connection that reads a CSV file on a Server drive. After Connectivity Studio have read this file it must be moved to an Archive folder. Is the possible from Connectivity Studio Standard?

After the process is done I need to have the file name of the file shown in History? Is this possible?

Now, there can be three ways of achieving this scenario:

  1. Archiving files after import in (asynchronous manner), for example by implementing and Event Generator activity at the end of the pipeline.
  2. If you want to read and archive the file in the same connection (synchronous manner) create your custom activity and attach it to your connection. See the Software Development kit to know how to create you custom activity.
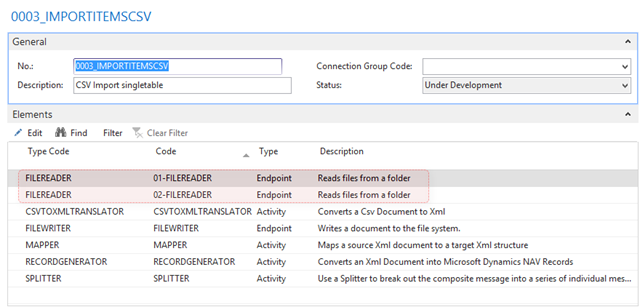
  3. You can also use the existing elements you achieve the scenario, by using two File Readers and a File Writer.

This article explains the 3rd scenario…

Using existing elements to read and archive documents:

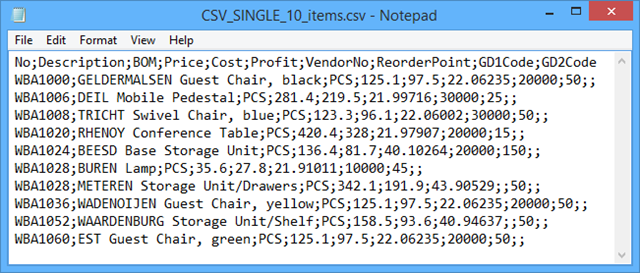
  1. I have a CSV file (CSV file CSV_SINGLE_10_items.csv) containing item information which must be imported.
    image
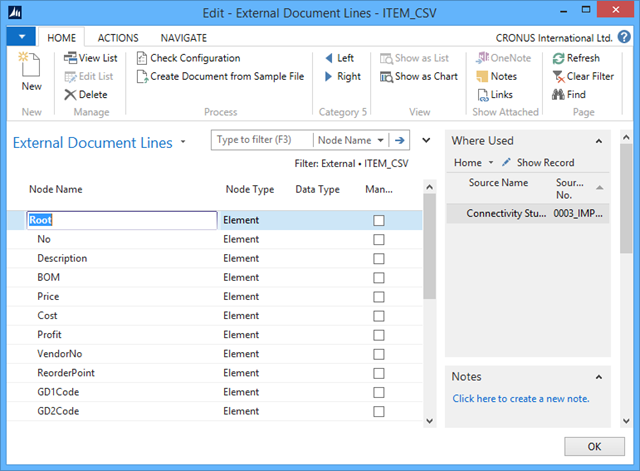
  2. Based on the sample file, create an external document (ITEM_CSV):
    image 
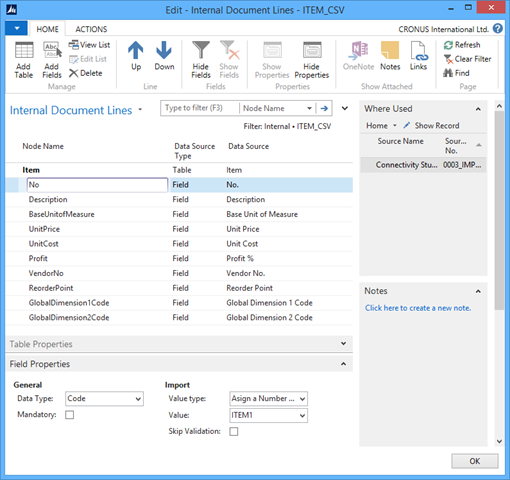
  3. Create an internal document (ITEM_CSV), depicting the NAV table and fields:
    image
    NOTE: The item number is generated automatically using an assigned number series.
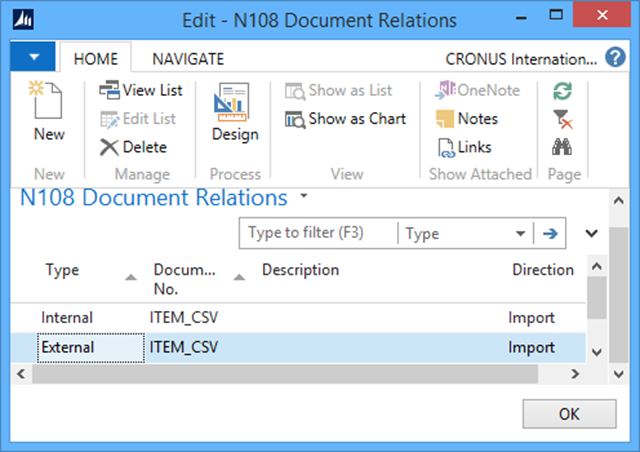
  4. Create an import connection (0003_IMPORTITEMSCSV):
    1. Attach the external and internal documents created in earlier steps and set the direction to import:
      image
    2. Select the following elements. Please note that we have selected 2 File Readers (change their names accordingly):image
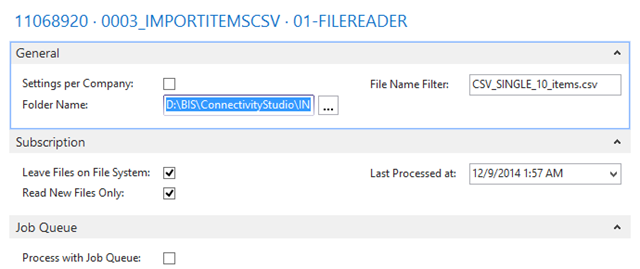
      1. 01-FILEREADER settings:
        image
        NOTE: This will read new files but not delete them after reading.
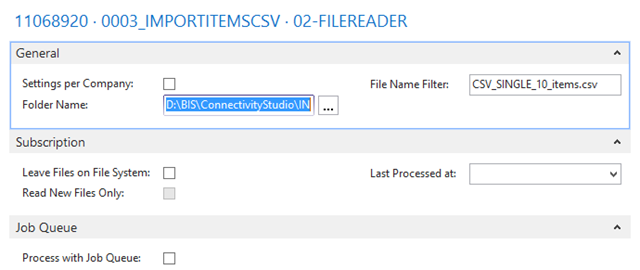
      2. 02-FILEREADER settings:
        image 
        NOTE: This will read the files and also delete them after reading.
      3. File Writer settings (endpoint to archive the file in a particular location):
        image
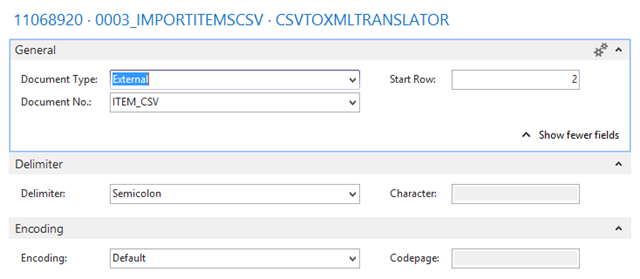
      4. CSV to XML Translator settings:
        image
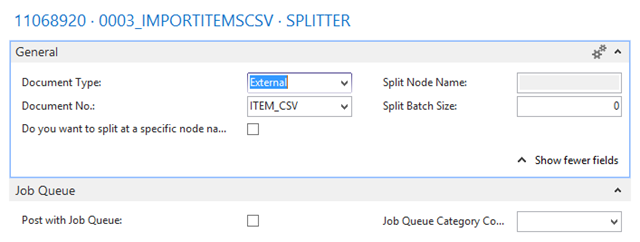
      5. Splitter settings:
        image
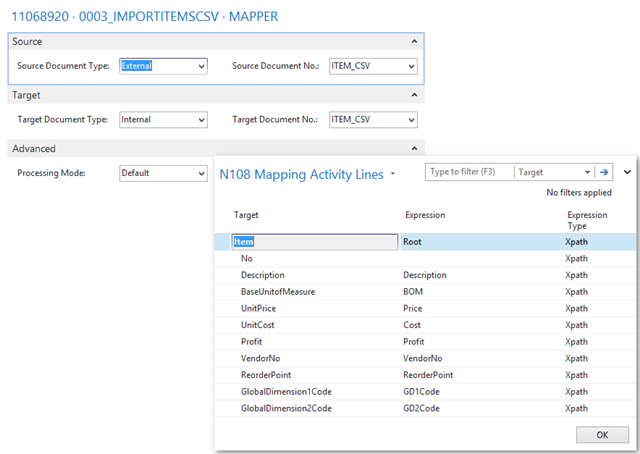
      6. Mapper settings:
        image
      7. Record Generator settings:
        image
    3. Setup the pipeline:
       image
    4. Process the connection.
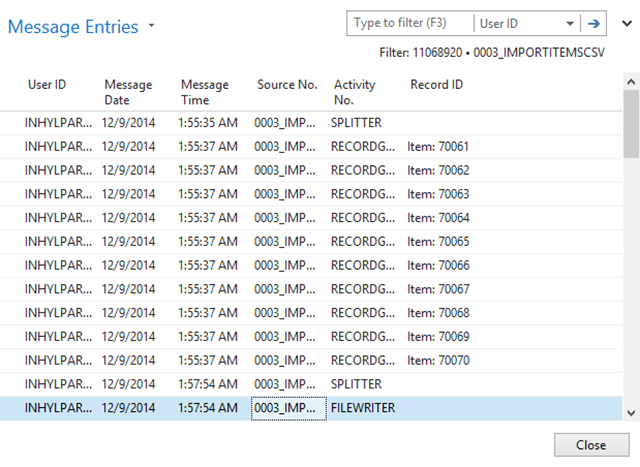
    5. Check the history:
      image

NOTE: The trick here is that the file name in both the File Reader activities should be the same, i.e. the File Readers should refer to the same document, else the result will not be correct.

Click here to download the example used in this article.

Posted in Solution Center | Leave a comment

FTP Reader – Recursive Reading

Every now and then we come across the following question:

Why is FTP Reader activity different than File Reader activity? Why don’t they possess the same settings and reading capability?

File Reader and FTP Reader activities are fundamentally different from each other, even though they both perform reading. The File Reader reads documents from a local or network drive, whereas the FTP Reader reads documents from a remote server which involves a different and complex communication channel. So you can understand, there is bound to be a difference.

For FTP Reader, BIS by default uses an FTP APIs provided by Microsoft .NET framework under System.Net namespace, which means that the FTP Reader has the same possibilities and limitations bound by the API. You can refer to various online articles on how the technology works.

Unlike File Reader activity the FTP reader activity does not support filtering on file name. Also, providing settings like Leave Files on File System and Read New Files Only, is not recommended as it creates a lot of performance issues.

Recursive Reading with FTP Reader

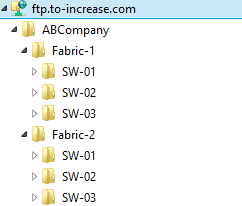
One of the major challenge with FTP Reader was its inability to read documents recursively, i.e. reading documents from subfolders.
image 

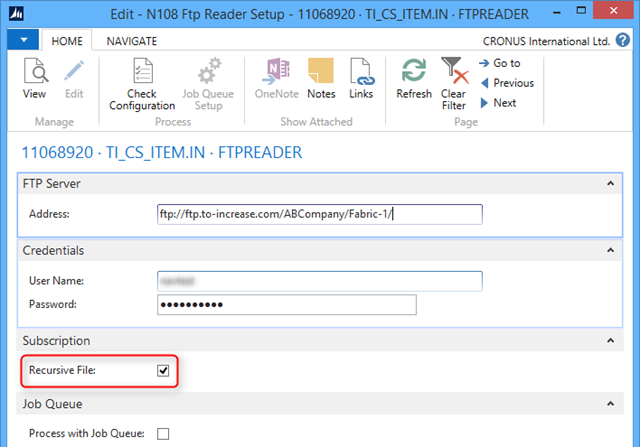
For this we have introduced a property: Recursive File. When you enable this property the FTP Reader activity will read all the files from the location specified and also from the subfolders available within that location.

image

NOTE: Please make sure you have setup necessary folder level permissions in the FTP.

Posted in BIS General | Tagged | Leave a comment

How to get SQL database Connection String

If you are working with SQL endpoints in BIS connections (such as SQL Reader and SQL Writer) you require Connection String to be able to connect the SQL database. If you are not sure how to write the connection string, this article explains how you can easily get SQL service database connection string from visual studio.

  1. You should know the following details of SQL Server:
    1. Server Name
    2. Username
    3. Password
    4. Database name which you want to connect
  2. Open Visual Studio.
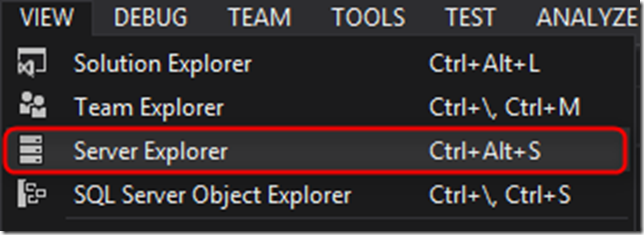
  3. Click View, Server Explorer.
     image
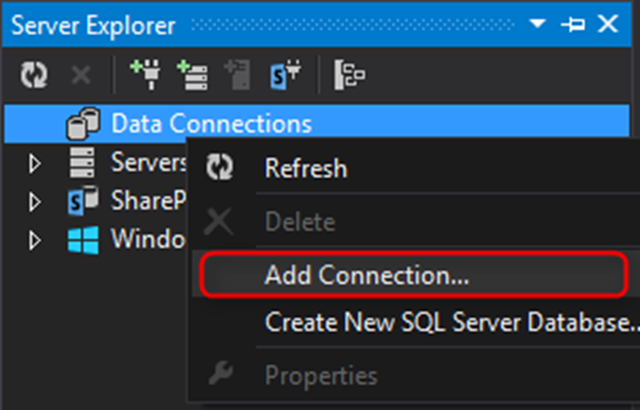
  4. Right click Data Connections, Add Connection.
    image
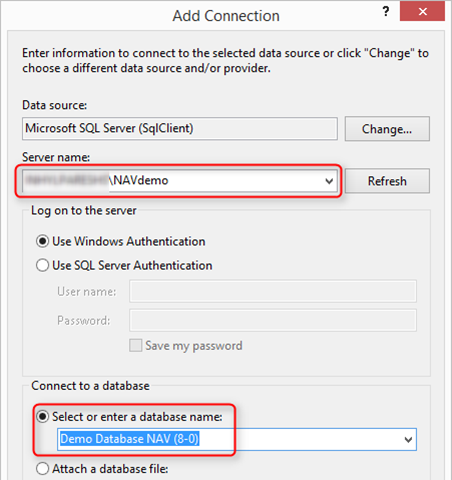
  5. On the Add Connection window, fill in the relevant details such as Server Name and Select or enter a database name.
    image
  6. Click on Test Connection button. If you submit the correct credentials, you will get the Test connection succeeded confirmation message.
  7. Now your connection is working successfully so, now click on Ok button. You will get one data connection under Data Connections.
  8. Right click on your connection and click Properties.
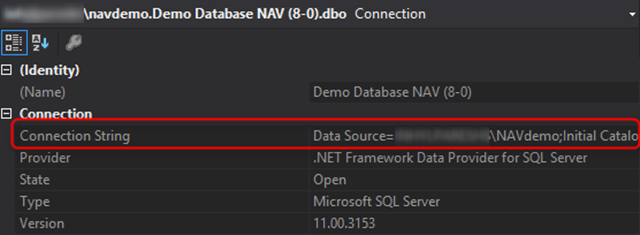
  9. You will get properties window of your connection. Find Connection String property and copy the connection string.
    image
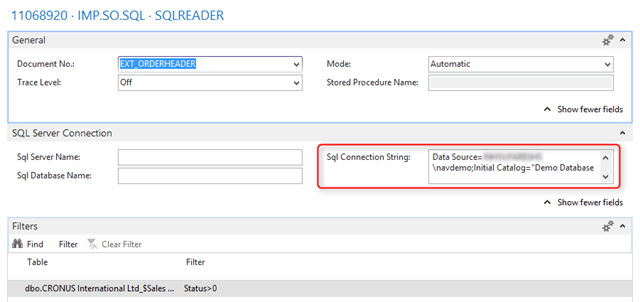
  10. Paste and use this connection string in properties of SQL Reader and SQL Writer endpoints.
    image

Please note that we have used Visual Studio 2013, as an example,  to find the SQL connection string in this article.

Posted in Others | Tagged , , | 3 Comments

Creating Import Connection Using SQL Integration

In Business Integration Solutions, you can use the SQLREADER endpoint to read XML messages from Microsoft SQL Server.

In this article we would explain how to create an import connection using SQL integration. the Focus would be mainly on the SQL Reader endpoint.

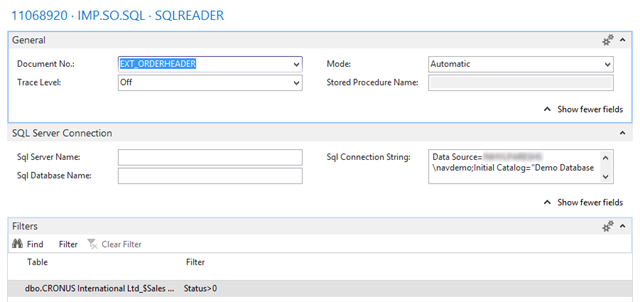
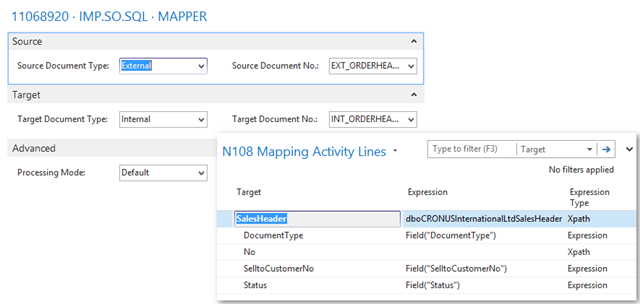
In the following example we will try to import the Sales Orders from SQL database if the status of the sales order (Sales Header) is other than “Open” (i.e. Status > 0).

  1. Create an internal document to import Sales Header information into Microsoft Dynamics NAV.
    image
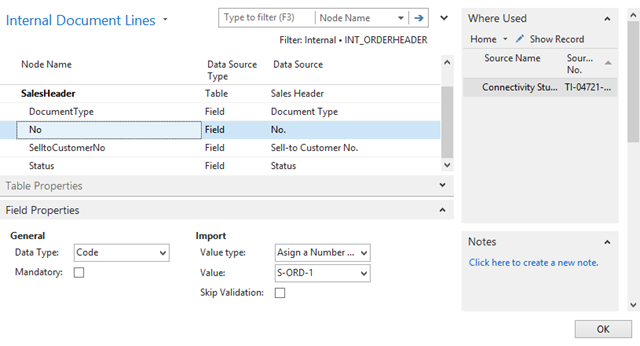
    We would like to generate the No. field automatically based on a number series. So select the No. field and in the field properties provide the Value Type and Value.
  2. Create an external document to import Sales Header information from SQL database.  Choose the Subtype as SQL Server and provide SQL server connection credentials or SQL connection string.
    image
    Then select the corresponding SQL table and fields.
    image
  3. Create a connection with a:
    1. SQL Reader
      image
    2. Mapper
      image
    3. Record Generator
      image
    4. Pipeline
      image
  4. Process the connection.
  5. Records are processed via Job Queue, if the Job queue is setup properly.
  6. If records are processed successfully, check History.
    image

We hope this example gives you an idea on how to work with SQL Reader endpoint.

Posted in Connectivity Studio | Tagged , | 2 Comments

Product Video: To-Increase Notification Management for Microsoft Dynamics NAV

To-Increase Notification Management helps ensure accurate delivery of critical information to the right person, at the right time. You can rely on the solution to send email messages automatically from Microsoft Dynamics NAV to your email address or mobile phone.

The messages can contain any information from Microsoft Dynamics NAV. Schedule messages to be delivered at the time you specify. Create report notifications for external documents and send them by email or fax as portable document format (PDF) files or HTML attachments.
Here is the official product video of Notification Management from To-Increase:

To view more product videos, you can subscribe to the official To-Increase You Tube Channel.

Posted in Notification Management | Tagged | Leave a comment

Product Video: To-Increase EDI Studio for Microsoft Dynamics NAV

As part of To-Increase Business Integration Solutions, EDI Studio offers template-based, extensible support for business communications and transactions that span industries, platforms, and applications. Because the solution integrates with Microsoft Dynamics NAV, users of the ERP system can continue working without leaving their familiar software environment. That means you also improve productivity and employee satisfaction.

Here is the official product video of Replication Management from To-Increase:

To view more product videos, you can subscribe to the official To-Increase You Tube Channel.

Posted in EDI Studio | Tagged | Leave a comment

Product Video: To-Increase Replication Management for Microsoft Dynamics NAV

To-Increase Replication Management for Microsoft Dynamics NAV replicates data from a central master data store to remote data stores. The solution brings together data from across the organization to support role-based ownership, sharing, publishing, and maintenance of accurate, current information.

Here is the official product video of Replication Management from To-Increase:

To view more product videos, you can subscribe to the official To-Increase You Tube Channel.

Posted in Replication Management | Tagged | Leave a comment